Developer ZeniMax Online Studios uploads forthcoming game content for The Elder Scrolls Online to their Public Test Server (PTS), available for a limited time. This playtest period is exclusively available to players on Mac and PC, in which you’ll need to have its PTS environment installed.
If you have yet to install the PTS environment and have access to the latest game content, don’t worry, as we have it covered. This guide outlines how to download and update the PTS environment for PC and Mac for ESO.
How To Install ESO PTS Launcher For Mac & PC
If you’re new to The Elder Scrolls Online and wish to try your hand at the new content and balance changes before its official release, you first need a copy of the base game available on Mac and PC. Additionally, you’ll need to have an active ESO account to gain access to the Public Test Server (PTS).

With an ESO account, you will have access to the game’s Launcher panel; once you’ve booted up the game, you can follow these steps to install the Launcher:
- After booting the game, the Launcher panel window will appear on-screen
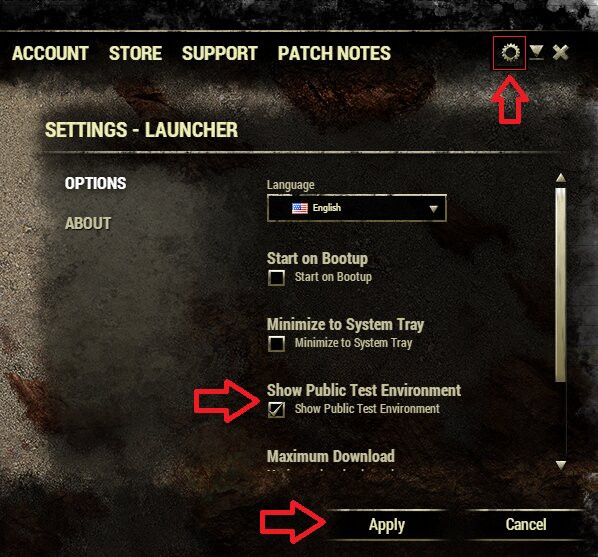
- Click on the Cog Wheel top right of the Launcher and select the Options tab
- Under Options, scroll down to Show Public Test Environment and check the box below it and click “Apply.”
- Head back to the Launcher’s Home screen, and in the Games column, click on The Elder Scrolls Online (PTS)
- With this option being highlighted, click the “Install” button to download the PTS environment.
Once this is fully installed, you can log into the PTS environment which, like logging into the game, has both NA and EU Megaservers. After selecting your preferred server, you can playtest the new content, adjustments, and optimizations for ESO.
From here, you can create a character on the bottom right of the screen and choose from multiple available template sheets. This will grant you access to the character’s max stats, for which you’ll also need to set additional stats like Consumables, Mundus Stones, Set Attributes, Set Champion Points, Set Keybinds, and have Addons disabled.
With this set for your character, you can start looking for the new equipment or gear which have been maxed out for the PTS. These gear sets are available within containers added to your Inventory, and you can start checking out the new content, preview the balance changes and the additions added to the Crown Store.
How To Update ESO Launcher For Mac

ZeniMax Online Studios have detailed in their Update 39 Patch Notes that their Launcher for Mac is available in Beta testing for which players can opt-in. According to the developer, this newly optimized Launcher will be pretty similar to its previous version, which features new options and “improvements,” including the following:
- Change Launcher’s text size
- Keyboard and gamepad support
- New options for the Settings menu
- Better visual changes on the Launcher loading bar when patching
- New resolutions scaling, which includes 4K support
- Enhanced News Feed
- Log Files Access within the Settings menu
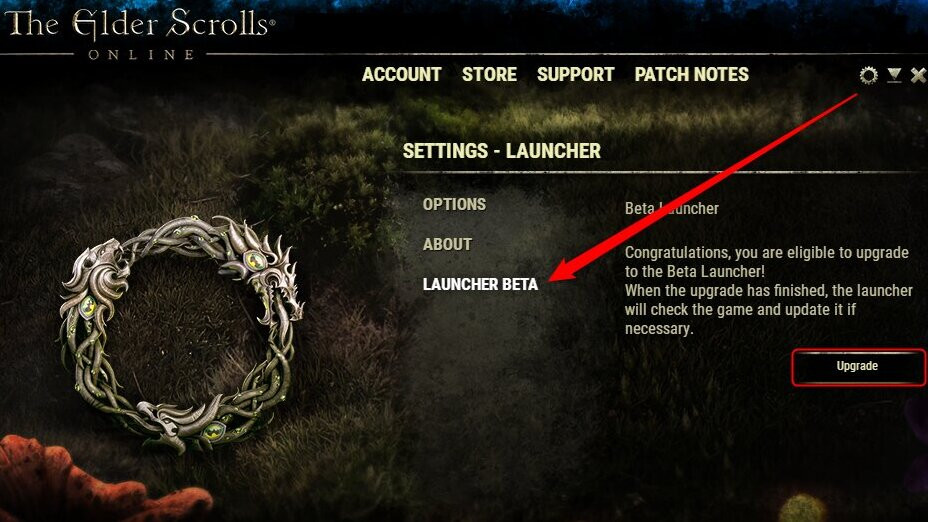
If you wish to try out the newly optimized game Launcher for Mac, players must have the existing Launcher booted up and click on the Cog Wheel top right of the panel. Scroll to the Launcher Beta tab, click the Upgrade option, and select it again for the Launcher Beta to begin installing.
Wait until the installation process is completed, which will launch automatically, and you have successfully transitioned to the Launcher Beta. This is indicated by the purple-colored banner top right of the Launcher panel, and you can revert this process by selecting the Downgrade button from the Launcher Beta settings.