
Rockstar Games has hit our nostalgic side with the launch of GTA Trilogy taking us back over 20 years to once again explore Liberty City, Vice City, and San Andreas.
Any fan of the series will know that much of the joy in these titles is exploring their vast maps and trying to complete them 100%, which will involve completing stunt challenges, collecting hidden items, and maxing out mini-games.
In GTA III, one of those side quests was finding the game’s Hidden Packages, tucked away in every conceivable corner of Liberty City.
If you are struggling to find those in the remastered GTA Trilogy, then look no further, as this guide will show you all 100 Hidden Package locations.
GTA III: All 100 Hidden Packages locations within Liberty City
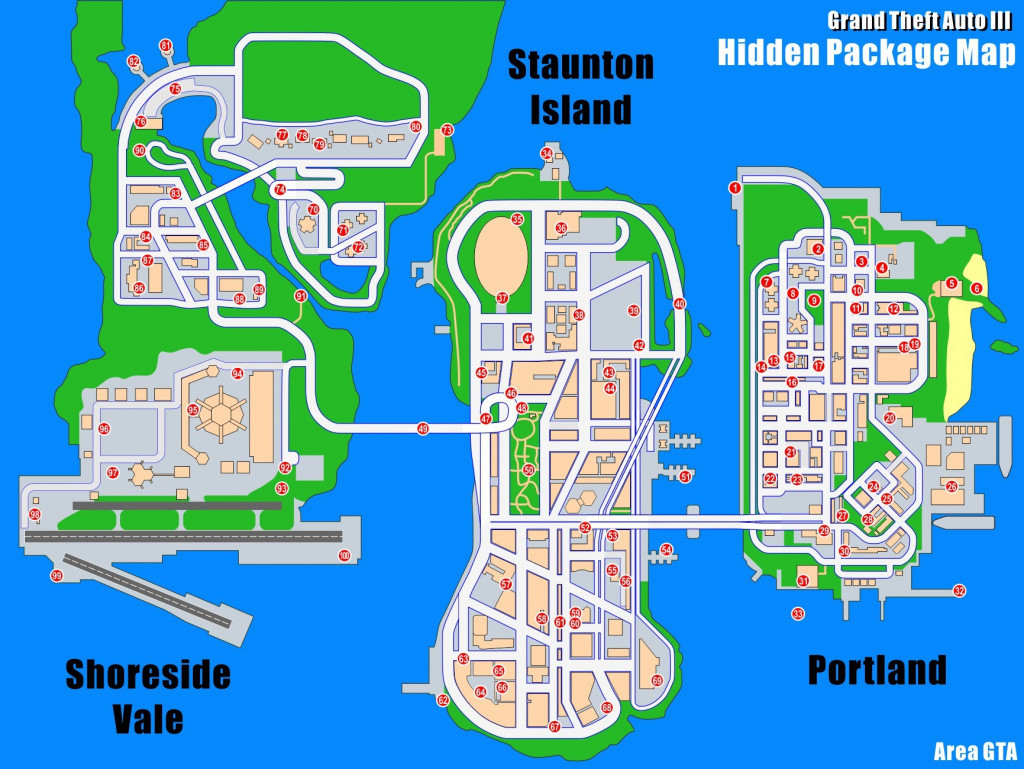
We will get straight to the point and tell you where you can find every Hidden Package in every district within Liberty City:
Portland District
Hidden Package 1 – Location: Portland (North)
You can find this package just above the tunnel entrance leading to Staunton on the far northwest side of the island. Run along the platform south of the tunnel entrance along the water to find it.
Hidden Package 2 – Location: Portland (North)
This package is found on the roof of the HEAD Radio building, one of the last buildings on the north side of Portland going toward the Staunton tunnel. The only way you can reach the roof is by going south a block to find stairs to the L Train rails, and run along them to jump onto the roof (where you can also find a Flamethrower weapon)
Hidden Package 3 – Location: Portland (North)
You can find this package inside the gated Hepburn Heights area on the northwest side of Portland, just north of your safehouse (Where the Diablos gang symbol is). Once inside the walled area, head along the side to the northern part along the walls to find an alcove at the very top.
Hidden Package 4 – Location: Portland (North)
This package can be found in the central part of Hepburn Heights, just north of your safehouse on the street to the right. There’s a large park area here, and a group of trees and bushes on a raised platform hides the package.
Hidden Package 5 – Location: Portland (North)
This package can be found in the grassy part of Hepburn Heights, just northeast of your safehouse on the street to the right two blocks away. In an area full of trees below the train rail line, look for it in the middle of a grove.
Hidden Package 6 – Location: Portland (North)
You can find this package inside a building called RUSH Construction Company, located on a street corner below a rail line, and across from an Ammu-nation Store. Crash your car into the building’s windows to get inside.
Hidden Package 7 – Location: Portland (North)
Across the street from Luigi’s Club, look for an alley with stairs leading up to the rooftops that overlook Sex Club 7’s front entrance to find the package.
Hidden Package 8 – Location: Portland (North)
Look in the alley where you start the first few missions at Luigi’s Sex Club 7, and use the stairs nearby the back door to find the roof where the package is.
Hidden Package 9 – Location: Portland (North)
From the rooftops where the previous package can be found above Luigi’s Sex Club 7, move southwest to jump to an adjacent rooftop, then run to the west edge to find the package at the corner ledge.
Hidden Package 10 – Location: Portland (North)
This package can only be gained once you are able to take the subway over to Staunton, enter the subway area on the south side of Chinatown to find it in the bathrooms.
Hidden Package 11 – Location: Portland (North)
You can find this package east of Hepburn Heights near a closed off-road full of potholes. Search the broken building next to it to find the package among the rubble.
Hidden Package 12 – Location: Portland (North)
One block north of the broken condemned building and closed off-road full of potholes, look for a set of two garages and run around the back of the building to find the package.
Hidden Package 13 – Location: Portland (North)
Located at the AMCo Gas Station on the north side of Portland, you need to reach the roof, which you can do by hopping up on the wall by the gas station entrance and carefully running along the top to drop to a lower level and jump across to the roof.
Hidden Package 14 – Location: Portland (North)
This package is inside the Easy Credit Auto Store located next to 8-Ball’s Auto Yard, which you can find at the end of the large lot under the Auto Sign, along with a Banshee car (break the glass to get inside).
Hidden Package 15 – Location: Portland (North)
Along the northeast roads of Portland by the Salvatore Leone Family, look at the top of the road for a small parking area and a grassy plot leading to a blue roof, and hop over the other side into a long stretch of grass between the buildings where the package is located, just before a Shotgun.
Hidden Package 16 – Location: Portland (North)
Located in the Salvatore Mansion, head up the stairs and go around the left side for a small walkway around the back of the mansion to find it.
Hidden Package 17 – Location: Portland (North)
This package can be found below the Salvatore Mansion on the east side of Portland. Carefully make your way down to the beach east of the mansion and go south until you reach a large rocky arch where the package is on the rocky ground.
Hidden Package 18 – Location: Portland (North)
This package can be obtained by first going to 8-Ball’s Auto Yard, and looking in the back for disused train tracks leading into a long tunnel. You’ll find the package halfway in surrounded by armed bums.
Hidden Package 19 – Location: Portland (North)
You can find this package in a long alleyway full of clotheslines south of the Salvatore Mansion. Look for an alcove on the right of the alley to find a package next to an Uzi.
Hidden Package 20 – Location: Portland (South)
This package is located on top of the large SupaSave Store, but to get it you will need to get up on the L Train at the top of the nearby hill and hop down from the tracks onto the store roof, where you’ll find it at a corner.
Hidden Package 21 – Location: Portland (South)
You can find this package at the Portland Harbor dockyard, where you have to blow up the Columbian ship for a mission. Look on the southernmost building for stairs up to the roof, and take a running jump north to the awning of a nearby warehouse where the package is.
Hidden Package 22 – Location: Portland (South)
This package is located on the roof above the Liberty Pharmaceuticals building next to Joey’s place, but to get to the roof you will need to backtrack up the large hill to the L Train rail and run along with it until you spot the twin smokestacks of the pharmaceutical building. Look for a girder support beam jutting off to the left, and use it as a launching point to run and jump down onto the building, and make your way to the far ledge to find it among other pickups.
Hidden Package 23 – Location: Portland (South)
Opposite Joey’s shop and the Liberty Pharmaceuticals building is a large walled area with the Bitch ‘n Dog Food Factory sign. Enter via the automatic gate and look behind the main building for a package in an alley.
Hidden Package 24 – Location: Portland (South)
Next to Joey’s garage is a storage lot with a chain fence at the back, and you can find a package in an alcove at the back near the fence line.
Hidden Package 25 – Location: Portland (South)
Southwest of Joey’s garage is a green area with a few low stone walls and a ramp, and a package is hiding behind one wall. You can either enter via an opening on the road to the north or just park your car next to the wall and use it to jump over.
Hidden Package 26 – Location: Portland (South)
On one of the main Chinatown streets on the west side of Portland, look for a shop called Hong Hung Inc, and find an alley next to it that goes behind the store where the package is.
Hidden Package 27 – Location: Portland (South)
Located on a rooftop in Chinatown off the main street near the southwest side. Look for an alley with stairs to get up to the top where you’ll find it.
Hidden Package 28 – Location: Portland (South)
This package can be found down a long narrow box-filled alley in Chinatown across the street from the rooftop package, in between a long thin block section on the southwest side of the district.
Hidden Package 29 – Location: Portland (South)
Located opposite the Liberty City Sawmill in the south part of Portland, there’s a walled building right next to the onramp to the main bridge leading to the other district. You can hop off the ramp and look behind several signs along the wall to find the package.
Hidden Package 30 – Location: Portland (South)
This package is found on the rooftops of the Liberty City Sawmill building in the far southwest of the district. The place has walls all around, but if you travel east to the adjacent bus depot, you can find a low wall to hop on and take it to jump over into the sawmill lot and climb up a debris pile onto the rooftops.
Hidden Package 31 – Location: Portland (South)
This package is hiding in the Turtle Head Fish Co. headquarters, the site of a Triad boss during one of your story missions. The gate here on the south side of Portland will remain closed unless you drive up with a Triad fish van or a garbage truck.
Hidden Package 32 – Location: Portland (South)
You can find this package along the piers that are in the far southeast of the Portland district. Run all the way to the farthest edge of the eastmost pier south of the main dock site, and you can find the package by a blue shipping crate.
Hidden Package 33 – Location: Portland (South)
To get this package, you must first complete all main missions in Portland to unlock Staunton, and you’ll escape by boat. While doing so, look for a small rocky island on the far south side of Portland, and land on it to find the package, just south of the Triad fish co. hideout.

Staunton District
Hidden Package 34 – Location: Staunton (North)
This package can be found on the very north edge of the middle district island of Staunton, around the corner from a gated area along the ledge.
Hidden Package 35 – Location: Staunton (North)
This package is located on the top right corner outside the arena in northern Staunton, just behind three large Rockstar billboard signs on the street corner.
Hidden Package 36 – Location: Staunton (North)
You can find this package above the entrance to the Staunton hospital on the North part of the island across from the arena. To get onto the low roof, drive a nearby ambulance over and hop up onto the hood and over to the top.
Hidden Package 37 – Location: Staunton (North)
Look for the front entrance to the large sports arena in the northwest section of the island, and run up the steps to find the package at the door.
Hidden Package 38 – Location: Staunton (North)
To the east of the sports arena and south of the hospital is the St. Matthias University, and you can find a sign at the street corner on the top right. Dropdown into the sunken area below the sign to find a package by a doorway.
Hidden Package 39 – Location: Staunton (North)
This is one of two packages located in the large construction site in Staunton. You can find it on the ground in the far bottom-right corner of the site.
Hidden Package 40 – Location: Staunton (North)
One of two packages located in the large construction site in Staunton. Once inside the yard, enter the partially completed building and find the stairs to the second floor, and look inside an empty room to find the package near some other pickups.
Hidden Package 41 – Location: Staunton (North)
You can find this package on top of a small arched bridge along the eastern road past the construction site. To reach the top, jump on the sloping beam on the side and carefully walk up to the top and across the middle.
Hidden Package 42 – Location: Staunton (North)
This package is located in the alley behind a garage car park area across from the car spray centre in an alley, inside an empty garage lot.
Hidden Package 43 – Location: Staunton (North)
This package is located inside the large car park garage itself next to the Car Spray centre alley, up on the second floor of the car park, hiding next to the ramp to the third floor.
Hidden Package 44 – Location: Staunton (North)
To get this package, you will need to hijack a Colombian Cruiser (one of the black pickup trucks) from the Colombian Cartel territory, then drive it to the street above your safehouse to find a sealed gate that will open for your cruiser car. Inside, look in the open garages to find the package.
Hidden Package 45 – Location: Staunton (North)
This package is located in an alley just around the corner from a sign for Uncle BJ’s Deli & Groceries, along the westernmost road south of the sports arena.
Hidden Package 46 – Location: Staunton (North)
Take the western-most road along the middle until you pass under the Staunton bridge and look for a small tunnel area below the ramp to the bridge, and you’ll find a package here.
Hidden Package 47 – Location: Staunton (North)
This hard to find package requires you to start taking the looping onramp up to the Staunton bridge on the west side of the island, but look along the ridge down to a low roof on the street corner below near your safehouse to find a package on the corner.
Hidden Package 48 – Location: Staunton (North)
This package can be found in the basketball courts located just south of your safe house, in the park to the right of the circular onramp to the large bridge.
Hidden Package 49 – Location: Staunton (North)
This particular package can only be obtained once you have access to the final Shoreside district from Staunton and will appear on the part of the suspension bridge that lowers when you have access, along the median divider.
Hidden Package 50 – Location: Staunton (South)
This package can be found in the main central park in Staunton, located around the centre of the park. Look for a small dip with a bridge and you’ll find the package under the bridge.
Hidden Package 51 – Location: Staunton (South)
You can find this package right where you first arrive on the island of Staunton and join the Yakuza, on the southern harbour of the two docks from where you can meet Asuka, it’s at the very end of the pier.
Hidden Package 52 – Location: Staunton (South)
Like the previous Hidden Package, this one can be found along the last dock on the eastern edge of the Staunton island, south from where the Yakuza can be found on the other side of the main bridge.
Hidden Package 53 – Location: Staunton (South)
You can find this package in a small alley lot below the main entrance to the police station on the eastern side of the island, just across the road from the harbour piers, in a small sunken path.
Hidden Package 54 – Location: Staunton (South)
This package can also be found by the police station on the eastern side of Staunton, but you’ll need to climb over the ledge by the front entrance to hop the fence and get into the back lot, where you’ll find the package by the back door to the station.
Hidden Package 55 – Location: Staunton (South)
You can locate this package at the front of the large museum just to the north of the police station in Staunton, just head up the main steps and look to the left.
Hidden Package 56 – Location: Staunton (South)
This package can be found as you get on the ramp towards the Callahan Bridge on the eastern side of the island, and either looks in an alley across from the Bank of Liberty or jump off to the right from the ramp into a large alley area where the package is.
Hidden Package 57 – Location: Staunton (South)
This package is hiding behind the large church on the west side of the island, but you can only reach it by walking around and in from the west-facing street to locate the package in an alcove.
Hidden Package 58 – Location: Staunton (South)
You can locate this package at an alley in south-central Staunton where the sign for the Hyaku Dojo is, and the package is found at the back of the alley.
Hidden Package 59 – Location: Staunton (South)
This package is hiding in a building between two streets in the south-central area of Staunton, look for a series of windows you can break to find stairs to the second level of the building where the package is.
Hidden Package 60 – Location: Staunton (South)
One of two packages is located in the AMCo building, this one can be found in the underground parking lot, right next to the elevators on the side of the room.
Hidden Package 61 – Location: Staunton (South)
One of two packages located in the AMCo building, this one can be found on top of the roof of the building, which will require you to find the stairs on the side to go all the way up.
Hidden Package 62 – Location: Staunton (South)
This package is located at the top of the Kenji Casino in the lower right part of the island, you can find the stairs up near the main entrance, and take it all the way up to the helipad to find the package in the corner.
Hidden Package 63 – Location: Staunton (South)
This package can be found at the large star-shaped white statue in front of a plaza to the west of Kenji Casino along the south road of the island. Look behind the statue to find the package.
Hidden Package 64 – Location: Staunton (South)
You can find this package on a small footbridge going over a street in the south centre road of Staunton, to the left of a large subway entrance.
Hidden Package 65 – Location: Staunton (South)
One of three packages located in a large projects area city block, you can find this by entering the back parking lot by taking the north alley path, where you can find the package against the far wall.
Hidden Package 66 – Location: Staunton (South)
One of three packages located in the large projects area city block, you can find the entrance to an underground parking lot on the northeast side of the road, and at the back of the lot is the package.
Hidden Package 67 – Location: Staunton (South)
One of three packages located in the large projects area city block, you can find this one on the roof by taking the stairs by the parking garage entrance on the northern road and jumping up to the nearby low roof to find the package.
Hidden Package 68 – Location: Staunton (South)
This package can be found on the far southwest side of the island near the projects area, it is at the foot of a door with a recessed red building front, sandwiched between two blue buildings that are facing the three-way intersection road.
Hidden Package 69 – Location: Staunton (South)
This package is located along the far southwest side of Staunton island where a long boardwalk is at the edge of the island. At the start of the boardwalk is a landslide area with several rocks, and the package is found behind the rubble.

Shoreside Vale District
Hidden Package 70 – Location: Shoreside Vale (North)
Behind the round structures with the Jetties very close to the Columbian Mansion in the Cochrane Dam area on the west part of it.
Hidden Package 71 – Location: Shoreside Vale (North)
Behind the round structures with the Jetties very close to the Columbian Mansion in the Cochrane Dam area in the east part.
Hidden Package 72 – Location: Shoreside Vale (North)
Whenever you get to the base of the Cochrane Dam you will find the first long flight of stairs that leads to a tower, climb them and you will find the package at the top.
Hidden Package 73 – Location: Shoreside Vale (North)
After the last package, find another set of stairs that lead into a large, flat area and there you should be able to locate this package in the helipad.
Hidden Package 74 – Location: Shoreside Vale (North)
To avoid a longer trip if you jump right where you found package 73 you will be able to land right where this one is, you just have to look behind the big boulder.
Hidden Package 75 – Location: Shoreside Vale (North)
For the next four hidden packages, we will be going to the “Swank” houses on the northeast side of Shoreside. On the most western house, you will be able to find this one.
Hidden Package 76 – Location: Shoreside Vale (North)
Two houses down the road where you found package 75 you will locate this one on the porch.
Hidden Package 77 – Location: Shoreside Vale (North)
On the very next house, as well as on the porch, you will be able to find package 77.
Hidden Package 78 – Location: Shoreside Vale (North)
Lastly, you will go to the very last mansion on the street and once you enter the backyard you will be able to find package 78 in the pool.
Hidden Package 79 – Location: Shoreside Vale (North)
If you keep moving east from the last package you will find some picnic tables near the shore where you can locate package 79.
Hidden Package 80 – Location: Shoreside Vale (North)
On the fenced area on top of the Fudge Packing Factory, you will be able to get there by climbing a pipe in the building with the green rooftop then jumping on to this one.
Hidden Package 81 – Location: Shoreside Vale (North)
Within the overpass tunnel in the Cedar Grove area.
Hidden Package 82 – Location: Shoreside Vale (North)
You can now head over to the mid-west part of the map and find the Police Station where you can find package 82 on the roof.
Hidden Package 83 – Location: Shoreside Vale (North)
If you move a couple of streets to the east you will locate the Pike Creek building that has some oil drums, behind you will find this package.
Hidden Package 84 – Location: Shoreside Vale (North)
Keep moving east, cross the river and you will find a billboard sign and a van near the hideout, this is where you find the next package.
Hidden Package 85 – Location: Shoreside Vale (North)
The next two packages will be found in the Wichita Gardens apartments. The first one will be right at the entrance.
Hidden Package 86 – Location: Shoreside Vale (North)
This package is going to be in between the building right there on the Wichita Gardens apartments as well.
Hidden Package 87 – Location: Shoreside Vale (North)
If you head back to where you swept packages 82 and 83 you will be able to find this one near a blue garbage container on the east side of the Hope Medical College.
Hidden Package 88 – Location: Shoreside Vale (North)
Keep going south to the front of the medical building and you will be able to locate the package right behind the hospital.
Hidden Package 89 – Location: Shoreside Vale (North)
Go back east close to the river before crossing to the Wichita Gardens area and you will find a building with a weird awning. Climb the rooftop of the contiguous building and then jump.
Hidden Package 90 – Location: Shoreside Vale (North)
This one is on the building right next to the last one on the Turtle Head storage between a garage and a wall.
Hidden Package 91 – Location: Shoreside Vale (North)
At the very end of the river before crossing to the Wichita Gardens area you will find a wooden bridge. Look underneath for this hidden package.
Hidden Package 92 – Location: Shoreside Vale (South)
The last nine packages will be found in the Francis International Airport area. This first one is right on the parking lot at the very front.
Hidden Package 93 – Location: Shoreside Vale (South)
For the next one, you will head over to the southwest part of the airport and find an open hangar. Underneath the right wing of the plane there, you will find the next package.
Hidden Package 94 – Location: Shoreside Vale (South)
Head back to the parking lot and midway there you will see a dome, on the ground you will find this package.
Hidden Package 95 – Location: Shoreside Vale (South)
South of where we found the hangar of package 93 you will be able to locate a plane in the middle of the way, underneath is the next packages.
Hidden Package 96 – Location: Shoreside Vale (South)
The next two packages will be found at the entrance of the airport on the east side. The first one is right in between the airport and the billboards.
Hidden Package 97 – Location: Shoreside Vale (South)
For the next one, locate the subway entrance in front of the airport and go down to the lowest level where you will locate the next package.
Hidden Package 98 – Location: Shoreside Vale (South)
You can head over west now for the next two packages, the first one is going to be the helipad close to where the two runways meet.
Hidden Package 99 – Location: Shoreside Vale (South)
For this one locate the beginning of the smaller runway that points to the ocean and you will find the hidden package 99.
Hidden Package 100 – Location: Shoreside Vale (South)
For the very last package, you have to locate the main runway that points to the rest of the map and follow it until the end where you will find the very last package.
Remember that for every ten hidden packages you collect, you will be able to claim a thousand dollars plus additional rewards as follow:
- 10 Hidden Packages – Pistol
- 20 Hidden Packages – Uzi
- 30 Hidden Packages – Grenades
- 40 Hidden Packages – Shotgun
- 50 Hidden Packages – Body Armor
- 60 Hidden Packages – Molotov Cocktail
- 70 Hidden Packages – AK-47
- 80 Hidden Packages – Sniper Rifle
- 90 Hidden Packages – M16
- 100 Hidden Packages – Rocket Launcher (and 1 Million dollars)
Be on the lookout because we will bring you the latest news and tips on GTA Trilogy and GTA Online in our dedicated section.
Featured image courtesy of Rockstar Games.